Anniver -say what?

AHHH!!! Hello all you good looking people I’m so sorry it’s been awhile since I last updated, what do I have planned for you… Well last weekend we celebrated my grandparents in law’s 70th Wedding Anniversary!! WOAH like what the? I’m so stoked for these guys (hurry up and say the puns with life sentences and all that garbage) I wanted to acknowledge the fact of how beautiful love is between two people from the day they first met right up until the many years later!

After googling  what gift do you get for a 70th anniversary I found out that 70 = PLATNUIM I think that this is so cool as it weirdly reminds me of a platnuim album haha. So what’s this got to do with scrapbooking? Well nothing really but it got me thinking of me and my husband and what I did for our first wedding anniversary… So as I said 70 = platinum in wedding years so when I was looking up ideas for our 1st anniversary what did I find? 1 = paper!! Winning!! I had some fun with this one I made a chain of people, an origami house and love hearts and wrote down reasons why I loved him and things that we had accomplished together. He really liked the idea and to anyone who is stuck on a gift to give for your first anniversary why not give this a go? look up some cool things you can cut out or make with origami because it’s always the thought that counts when it comes to gifts for your loved ones. You could even do up a little mini scrapbook of IMAG1426[1].jpgall the special things that you have done together in your first year or better yet why not take a selfie each year on your anniversary and add it to a growing scrapbook of your lives? Well I hope this has been helpful and it gets your brains thinking!! Love is the greatest gift of all.

After 5 years of marriage he still has the box that I did up for him! here is a peek of what I gave him I highly recommend this. And according to the tradition this year for me should be… Wood – this can go well as ta da what are photo frames made of?? Have fun everyone

Loving out, Lauren. xx

Scrapping and Wrapping

Good morning all, how are you all this fine Thursday? I just wanted to share with you what I got up to this weekend gone. So on the weekend it was hubby’s birthday (shout out to my husband he is awesome!) anyways I was again thinking oh what am I going to write for you lovely people and then it hit me while I was thinking of how to celebrate my husband’s birthday…

Bit of a back story hubby isn’t too big on over the top celebrations and what not. However  when it comes to his special day I still like to make a deal out of it one way or another. As I said he isn’t into over the top things therefore to him it’s the thought that counts. During the week I hit the shops thinking what is something little I can get him (as we had already agreed that I would like to buy him a watch but that was something we were going to buy together) I found myself in the good ol’ $2 shop (have I mentioned how much I love them haha) long story short I got him a bath bomb ‘from’ our son as my thought/hint behind it was he needs to relax and enjoy a nice bath without the noise of our little one interrupting us.

IMAG1377[1].jpg

Bath bombs and scrapbooking? Well I was thinking how am I going to wrap this then I remembered this cool youtube video I saw about wrapping oddly shaped gifts, you can find the link here. So I got creative and used some scrapbook paper as my wrapping paper to wrap this little gift; I used a kaisercraft baby boy themed paper as the gift was ‘form’ our son and wrote a little note to him and attached it to the front.

It’s something sweet and simple and can be used on any gift for any occasion especially the little ones that are hard to wrap. I hope you have enjoyed the post love feedback as always, enjoy the rest of your week, Lauren.

Acrylic Album Photos

Hello all, last week I shared with you a post on acrylic albums and just wanted to share some more photos of the album I did up of my wonderful nephew!! Shout out to my family who are awesome and let me use these pics so I could show them off to you lovely people 🙂 Without further ado….

IMAG0111.jpg
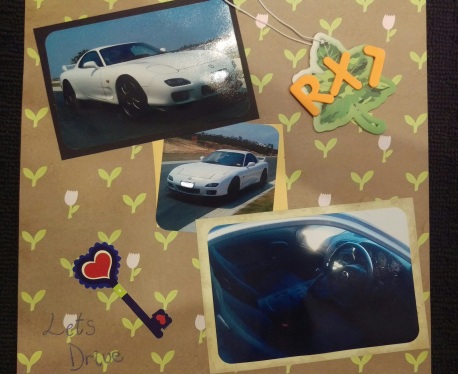
As mentioned in the previous post I thought outside of the circle and let the photo hang off the album.

IMAG0112.jpgHere you can see photo backs from the other pages but I’ve done my best with directing you away from the white to the photos on the current pages and again use your bling (embellishments)

IMAG0113


Just showing off how cute my nephew is, bias what? Yes that is a crown from the other page he’s a prince charming already can’t you see.


IMAG0114

Scrap it! Those toy story pics are from an old calendar, make use of your scrap papers especially old calendars they are so handy.

Hope you have enjoyed how I used my clear album, have fun with them and don’t stick to the pages. I found normal glue worked fine but you may want some stronger glue or the double sided photo splits (yep didn’t know they were called splits I would of gone with tape ha!)  if you aren’t going to see it on the other page as it can get tricky placing the items. I tried to use some rub on stickers but found they just weren’t working so I just cut them and stuck them.  (rub on example is ‘one big happy family.’ in photo 2)

Enjoy your week everyone! Lauren.

Acrylic Albums

Hey how are we all this fine Thursday? Hope you’re excited not long until the weekend!! Anywho, today I wanted to share with you my acrylic album I made up at Christmas to give to my brother and sister of their precious boy that was born.

What is an acrylic album? It’s pretty much a clear album, yep fancy words again. So how do you make this work when your pages are clear and you want to stick photos on it? Well that’s all part of the trick! I admit I found it hard and when I got this album I was thinking how the heck am I going to use this but low and behold our wonderful friend google helped me find what other people did with theirs and thus gave me inspiration to do mine. Are you ready for the secret? LAYERING! it can get a bit fiddley trying to work out how you’re going to cover up what’s going to be on the next page but with some careful playing and positioning it works well! Remember to embellish the heck out of it. I used bits from everything; I had an old baby card that I used as the ‘cover’ and I even used a calendar cut out, yes there may be some white spots from the photos but if you put enough pretty things around it doesn’t take away too much or you can try and position it so it looks like a boarder to the other photo on the other side (insert Adele’s song here :P)  The other great thing I did with mine was not stick to the page limits some of my photos poked out from the bottom some tags and embellishments hung from the sides and another great tip is to use scraps of ribbon to tie around the loops of the pages. Here is a peak of the cover page of the album I did. Would love to see you ideas.

baby.jpg

For more ideas and inspiration check out these sites I found them really great.

http://artglitterblog.blogspot.com.au/2013/08/robot-acrylic-album-with-art-glitter.html

http://www.scrapbook-crazy.com/acrylic-mini-book.html

http://www.scrapbook-crazy.com/my-life-mini-album.html

I also like how all these albums have been kept simple as I have seen quiet a few where they take away from the fact that the album is clear by just making it look like a normal paper page, the point is for you to be able to see through to the next page.

I got my album from a 2nd hand shop, it was Kaisercraft brand so your local shop might stock them or maybe try spotlight or your local scrapbooking supply shop. Happy scraping

Enjoy the rest of your week! Lauren.

Cars and Scrapbooking

Hey how are we all? I hope your week has come out of the gates leaping for you! If not drink more coffee 😛 So today I was racking my brain thinking what the heck do I have for my post this week and then it hit me, My husband’s car! I’m going to give you a little story so we’re all on the same page.

As you can see by my title cars are going to be mentioned… So as the story goes, I’ve been a girl who has had her brothers into cars and wonderfully enough my husband is into his cars too. As scrapbooking is a hobby to me cars are a hobby to them and so when finances hit hard (I’m mum on maternity leave here) my wonderful amazing husband decided it was the right thing to do to sell his beauty. If you have men in your life who love cars you know this is a big step for a man to take it’s like cutting off their arm! And yes I’m not that into cars but this baby is SEXY and what woman does not like a sexy car?? Ah hello no one it’s such a pity though because usually when I’m driving along the highway and you see a sexy car coming up in your rearview  and then as it passes you turn to check out the car and then the person (like come one you have to have a perve too) and then you wish you hadn’t because it’s usually a bald man in his 40’s, sad face. Am I right? And then have you ever been behind the wheel in a fast car! Oh my, you feel like this super sexy lady driving a really really ridiculous good looking car. Yes ok I’m rambling.

Back to the story, so hubby has decided to sell his baby and I had to do the ‘are you sure?’ question 50 times because I myself couldn’t believe it. And so as we wait for this babe to sell it got me thinking of what a sacrifice my husband is doing and how much he loves and supports his family by giving up one (well actually one and a half he is getting rid of his ‘project’ car too!) of his prized possessions. Like heck if I could sell some of my scrapbooking ideas to people to make ends met I would. And I just wanted to honour him today and the sacrifice he is doing because he has done this all before when we first brought our house so I wanted to share with you his amazing cars and what I’ve done with my scrapbooking to show them off.

IMAG1359.jpg

Here is his first car a series 2 RX7 I did a whole scrapbook up for this car as this is a car he put a new motor in and all that under the hood stuff. It can be quiet tricky trying to make these pages look catchy as you can’t really cut down some of the photos but I made do and it allows people to admire the work he put into this car.

IMAG1360_1

And here is the baby that we are having to part with now another RX7 series 8 (yes we love our mazdas!) after we got married we saved enough money to get this beast, he had some work done to it but not much it’s been so much fun to drive and looks so nice and slick. I love the sound it makes (no it’s doesn’t sound like a fully sick commo it’s better then that!)


I could talk for ages about this I was going to elaborate more on my brothers too and their cars and movies that beautiful cars are in… If you want to hear more let me know and maybe I’ll do a part two.

Enjoy your weeks everyone!! Lauren.

P.S  If you or anyone you know might be interested in this sexy beast feel free to give me a holla 🙂

Ugly paper? No Worries

Hello over there!! I hope you have been enjoying your week so far! As promised I was going to share with you my extra tip on what to do with some of your ugly pieces of paper.

Let’s recap I’ve suggested; using it as a layer over another piece of paper, making invites (you can see that here)  and last but not least decoupage. Dec0-what? Don’t worry yes it sounds fancy but really there is nothing to it think glammed up paper mache except you don’t use the flour and water trick.

Horse

Here is a picture of what me and my mum got up to with some decoupage; Mum had brought a wooden rocking horse and wanted to add some flare to it (by the way this is for sale if you are interested in it check it out at Rustic Boom) she asked me if I would like to decorate it with some of my scrapbook papers. At first I admit I was thinking this isn’t going to work how is it going to look good, but once I had sifted through my papers and found all my browns and creamy looking colors we got stuck into it and boy did it turn out well!! What do you need to decoupage other then the paper? Well I recommend some handy PVA/craft glue and mix it with a bit of water so it’s a bit more runny and then just brush the back of the paper and what your decoupaging with the mixture and get sticking. Mum then went over the horse with some varnish once it was all done and dry which is what you need to do it your doing it on furniture. IMAG1352_1You can even do it for normal scrapbooking too I’ve done that a few times especially with tissue paper or just to make the page have a pattern different to what that paper was originally here is an example; It’s not the best one but it’s a great memory I have with my school friends (we were so cool!)

Well I hope my tips have helped you with your dilemma of ugly paper the other last and final thought would be if it’s just too hard to use on anything sell it as they say another persons trash is another persons treasure.

Enjoy the rest of your weeks look forward to hearing your ideas on what to do with ugly paper, Lauren.

HELP!! I have UGLY paper!

Hello all, I’m sure we’ve all been there getting suck on idea on what to do with that piece of paper that just looks U-G-L-Y; Here are some tips that I have used to get rid of some of my not so nice scraps of paper.

  1. The easiest thing to do is to cut it up and use it as notes on the page or use it as some sort of embellishment. I find this helpful as if I have a really nice background but it just has too much going on I like to break it up with one of my ugly pieces or in the example below I simply used a plain colour background and then used the brown paper as a boarder for the photos I then suck over the top. This worked well because the not so nice brown suited the theme of dogs and when matched up with the right colour it didn’t look so bad. What are your thoughts?IMAG1335.jpg
  2. Make invites! Yes I know I’ve mentioned invites a few times in my blog but scrapbook paper has many uses and invites is one of the great ones! So you’re thinking EWWW I don’t want to use my ugly paper to send out to my friends! Well here is the tip use it and then embellish the jeebies out of it! I did it with a few of my baby shower invites as they were in the shape of a nappy and I simply added ‘it’s a boy.’ wording to it with a cute baby looking embellishment which then made the paper not look so bad.IMAG1336.jpg

Well hope you have enjoyed my handy tips stay tuned for next week as I share a bonus tip!

Enjoy the rest of this week, Lauren.

Happy AUSTRALIA Day!

If you haven’t already guessed I’m Australian and well today is the day we celebrate our glorious nation with a well earned public holiday. (Hats off to all the people working today I have been there, I hope you get to relax after your shift is over)

So what’s so special about Australia day? Usually it means kicking up the feet and relaxing with a stubbie in hand and soaking up the sun with some mates.

How does this relate? Well a lot of us like to head to the beach for the day to enjoy the sun, surf and sand and I have definitely had my fair share of Aussie days being celebrated on the beach and have had a lot of great memories come from them and just wanted to share them with you.

A few years ago our family rented a little cabin in a holiday park for the day and enjoyed the facilities giant jumping pillow (a jumping castle without the castle) and had fun trying to ping each other off it as you do, lots of laughs were had and it was a definite work out which we then cooled off by jumping into the pool. If you and the family are interested in the holiday park it is up at Caloundra, Sunshine Coast – here is the link.

IMAG0622_2_1[1]

Or if you have fur babies why not head down to a pet allowed beach, me and hubby usually make the little trek over to Nudgee Beach to let our dogs run and play along the beach here is a peak up some fun we get up to.

IMAG1298_1[1]

Well I hope your Australia day is filled with lots of fun and that you all don’t have too much of a headache for work tomorrow and to all the kids out there enjoy your last day of holidays! Lauren.

Oh before I forget if your thinking of doing some scrapbooking you of course need your photos printed and sometimes that can be costly, however I wanted to share with you all Harvey Norman has 9c  6×4 prints ending 7/2/16. Happy scrapbooking!

Back to… NO don’t say it! School

I don’t know about you, but school was awhile ago for me. You may be asking what does school have to do with scrapbooking well bare with me.

As you may or may not be aware of it’s not long until your kids go back to school and your probably beating your brains out trying to get everything organised PLUS entertain the kids for one last week.

Fear not I have an idea and it involves getting creative and hopefully a well needed sanity break for you.

What you will need: A roll of brown paper, glue sticks, scissors, clear contact, exercise books and anything you want to decorate it with (I find old magazines and calendars are great for this!) Clear your kitchen table and begin the fun.
Note: For the brown paper check out your local newsagent or I just had a quick google and it looks like office works supplies it too.

Before scrapbooking was a hobby to me decorating my school books was the next best thing and it was something I enjoyed doing before the dreaded school year started. Why not give it a go and add your personality to your school books after all you have to be opening them up and using them for the whole year.

I had a look around and couldn’t find any of the books I decorated when I was in high school but I found this golden oldie.IMAG0211_1[1].jpg I had cut out some heart shapes from some left over contact we had and decorated this book. One thing I love about scrapbooking to me is you can literally use scraps from other things!

Another book that I do remember doing was a whole book decorated with dog pictures cut out from a calendar I had from the previous year and every time I looked at the book during school it was a nice break from the ramblings of the teacher, especially if it was the first period of the day.

Well I hope I have given you some boredom busters before school starts up again, think outside of the box and have fun – turn your book into a movie poster or why not make it reflect the subject that you are doing? Numbers for maths, a big ancient ruin for history, maps for geography! Would love to see any pictures from what you or your kids have gotten up too!

Enjoy the last of the holidays, Lauren.


What a week…END

I’m sure you’ve all been there, you get to the weekend and it’s crammed full of events, well that was our weekend but let me take you back to how this all relates.

As I mentioned earlier in my blog last year I got to make some invites for my sisters birthday

Photo_2016-01-11_05-07-59_PM[1].png

Well that birthday was this weekend along with my sister in laws birthday as well, both parties turned out great and the whole family had a great time.

Just wanted to share some of the photos from the two days and the creativity we all got up to:

Photo_2016-01-11_04-13-06_PM[1]

For my sisters birthday my sister and I prettied up our masks by adding the well needed bling to them. Tara got her mask from a $2 shop along with the accessories to add the bling bling, as you can see the mask came in a nice simple plain colour and she has just gone ahead and added some feathers to the top and jewels on the joining parts of the mask. With my mask I was just touching it up a little bit as I had already had this lying around home so all I added was the feathers to revamp it, as before it had some fake leaves which had seen better days.

IMG_2937

So if your heading to a mask party and want to add a bit of flare to a simple mask why not try this? $2 shops are the best for these kind of things as you can always find feathers and jewels in the craft section; if your a Brisbane local try the $2 shop at Eagleby shopping plaza or Beenleigh Marketplace happy shopping and happy creating!

Here is a peak at my sister in laws birthday it was a vintage high tea, we decorated the house and set out all the nice tea cups some passed down the generations and some found at op shops (another great place to find bargains!) We also set up one of the rooms where the photos could be taken.

Photo_2016-01-12_09-43-03_AM[1].png

Some of the decorations we used for her party are for sale, if you want to check them out here: Rustic Boom

Photo_2016-01-12_09-40-15_AM[1].png

And for both parties my brother decorated both birthday cakes.

Enjoy the new week ahead! Lauren.